
Blade fence installation is more than sinking posts and hanging panels. The angled blade design creates specific wind loading and alignment challenges that standard fence installation guides rarely address. For a stable, long-lasting aluminum blade fence, you need the right post specifications, correct anchoring depth, and reliable fixing methods that accommodate thermal expansion and structural load. Without these, even premium blade panels will eventually lean, rattle, or develop unsightly gaps. This article walks through the post requirements and fixing techniques our engineering team has verified across multiple installation projects, so you can install blade fence that stays true and secure for decades.
What Are the Post Requirements for Blade Fence Installation?
Aluminum blade fence panels transfer wind pressure directly to the posts, so post selection determines the entire structure’s long-term performance. We specify 6063-T6 aluminum posts with a 3 mm wall thickness as the standard for blade fence up to 2.4 m in height. For coastal installations, 6061-T6 offers slightly better corrosion resistance; for inland projects, 6063-T6 provides the necessary balance of strength and cost-effectiveness. Steel posts are an alternative where high wind loads demand greater rigidity, but they introduce a galvanic corrosion risk that must be managed with isolation barriers.
Post spacing depends on blade height and local wind exposure. For a 1.8 m blade fence in moderate wind zones, we keep post centers no farther than 2.4 m apart. In open areas with sustained winds over 80 km/h, spacing tightens to 1.8 m. The table below summarizes the three post material choices and when each makes sense.
| Post Material | Advantages | Disadvantages | Typical Use |
|---|---|---|---|
| 6063-T6 Aluminum | Lightweight, matches blade panel color, good corrosion resistance | Lower load capacity than steel | Residential, inland climates |
| Hot-dip Galvanized Steel | High bending strength, lower material cost | Requires isolation from aluminum, heavier to handle | High-wind commercial sites |
| 316 Stainless Steel | Maximum corrosion resistance, high strength | Most expensive option, heavier | Marine and heavy industrial |
How deep should blade fence posts be?
Post footing depth follows a simple rule: one-third of the above-ground height plus a 150 mm gravel drainage layer. For a 1.8 m (6 ft) blade fence, the post hole should extend at least 750 mm below grade — 600 mm for embedment and 150 mm for gravel. In regions with frost line requirements, the footing must reach below the local freeze depth; where frost heave is active, we prefer a 200 mm gravel base beneath the concrete mass and a slight taper in the hole to resist uplift.
What type of post material is best?
The choice centers on project conditions. For 90% of residential blade fence installations, aluminum posts are the correct answer — they eliminate the need for isolation hardware and match the visual finish of the blade panels. We use aluminum exclusively where the fence will face salt spray or industrial emissions. Steel becomes relevant when post height exceeds 2.4 m or when the fence must integrate with existing steel gate frames. In those cases, nylon isolation pads at every fastener point and stainless steel connecting hardware prevent bimetallic corrosion.
How to Install Blade Fence Posts with Proper Anchoring
A poorly anchored post is the single most common cause of blade fence failure. Our field teams have replaced dozens of fences where the concrete footing was too shallow, had no drainage path, or wasn’t allowed to cure before panel attachment. The correct approach starts with a hole dug to diameter at least three times the post width — for a 100 mm square post, that means a 300 mm bore — and a gravel base tamped firm to prevent water pooling at the post bottom.
How to anchor blade fence posts in concrete
- Mark post locations with stakes and string line, checking corners for square.
- Dig holes to the required depth using a post-hole digger or auger. Keep the hole walls relatively clean; bell-shaped bottoms increase uplift resistance.
- Pour 100–150 mm of crushed gravel into the bottom and compact with a post or tamper bar.
- Set the post in the hole, brace it with two-way stakes and clamps, and confirm it is plumb in both planes with a spirit level.
- Fill the hole with concrete mix (we use a 25 MPa standard mix). Leave the top of the concrete slightly below ground level so water runs away from the post.
- Check plumb again before the concrete sets, then re-check after 15 minutes. Allow a minimum 24-hour cure before hanging blade panels.
On existing concrete slabs, we use aluminum base plates with four expansion anchors per post. The slab must be at least 100 mm thick and free of cracks within the anchor footprint. A structural engineer should verify pull-out capacity if the fence will exceed 1.8 m in height.
What Are the Best Fixing Methods for Attaching Blade Panels to Posts?
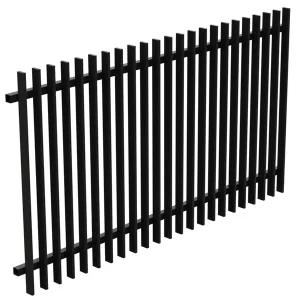
Blade fence panels typically arrive with horizontal rails welded or bolted to the blade ends. The connection between these rails and the post is the critical load transfer point. For side-fix installations — where panel ends sit between posts — we use a two-bracket system: an L-shaped bracket bolts to the post inner face, and a matching rail bracket slides into the panel rail channel. This arrangement allows for minor horizontal adjustment before final tightening and absorbs thermal movement without loosening.
Face-fix methods, where the panel rail attaches directly to the front of the post, work for shorter fences but create a visible offset that disrupts the clean lines blade fences are known for. We reserve face-fix for situations where post spacing must be reduced to accommodate an obstruction, never as a standard method.
All fasteners should be stainless steel (304 grade minimum), and every bracket-to-post connection should include a nylon washer to decouple aluminum from steel. On-site, we check bracket tightness with a torque wrench — 25–30 N·m for M8 bolts in aluminum posts — and mark each tightened fastener to simplify subsequent inspection.
If your project involves blades taller than 2 meters or sites with high wind exposure, confirm the post spacing and bracket load ratings with our engineers at sales01@yulongkeji-ch.com before finalizing your order.
How to align blade fence panels during installation
Blade panels are unforgiving of misalignment because the angled blades create a strong visual line that amplifies any deviation. We run a taut string line at the top of the posts and use a magnetic digital level on the rail to confirm both horizontal alignment and panel tilt. Start installation from a corner post, mount the first panel, and tighten its brackets fully. Then hang the next panel, engage the rail connectors loosely, and adjust until the blade tips align with the string and the gap between panels is uniform — typically 10–15 mm. A 5 mm deviation at one post will become a visible kink by the third panel, so we check alignment at every post before moving on.
How to Level and Align Blade Fence Panels
After all panels are mounted and brackets finger-tight, the final alignment pass begins. Walk the fence line with a 1.2 m spirit level held vertically against each blade row; if a blade tilts more than 2 mm off vertical, loosen the corresponding rail bracket and shim as needed. Laser levels are worth the investment on fences longer than 30 m — they eliminate the sag inherent in string lines and reveal small post misalignments that would otherwise go unnoticed until the light hits the blades at a low angle.
Check the gap between blade ends at each post. Uneven gaps usually mean the post was set slightly off the layout line, not that the panel is wrong. A steel wedge driven between the post and bracket can recover up to 8 mm of offset. Beyond that, the post itself needs to be re-set or its base plate slotted.
Once alignment is verified across the entire span, tighten all bracket bolts to specified torque, install post caps, and touch up any scratches with the manufacturer’s color-matched paint. Walk away and return in 24 hours — the fence will settle slightly, and a final check catches any movement before the job is closed out.
Post Installation Checklist and Maintenance for Blade Fence
Before signing off an installation, run this checklist:
- Every post is plumb in both directions.
- Concrete footings have cured and are below grade.
- All bracket bolts are torqued and marked.
- Panel gaps are uniform and no blade edge touches its neighbor.
- Post caps are seated and sealed against moisture.
- Scratches are touched up; no bare aluminum exposed.
Annual maintenance is simple: wash blades and posts with mild soap and water, check bolt torque (especially in high-wind locations), and reapply touch-up paint on any new nicks. Avoid abrasive cleaners, which dull the powder coat. With properly installed posts and brackets, an aluminum blade fence should hold its appearance and structural integrity for 25 years without significant intervention.
Poor post installation leads to leaning fences and panel misalignment that compromises both security and appearance. By using the correct post specifications, anchoring depths, and fixing methods outlined above, you ensure a blade fence that withstands weather and wind for decades. For technical guidance on post selection or to order aluminum blade fence systems with pre-engineered brackets, contact our engineering team at sales01@yulongkeji-ch.com or call +8619086315193.
Common Questions About Blade Fence Installation
Can blade fence be installed on an existing concrete slab?
Yes, using base-plate posts with expansion anchors. Drill into the slab at post locations, install anchor bolts with epoxy for additional holding strength, and secure the base plate. The concrete should be at least 100 mm thick and free of cracks in the anchor zone. For fences over 1.8 m, have a structural engineer confirm the slab can handle wind moment loads — pull-out failure on a thin slab is not recoverable.
What is the maximum post spacing for a 6-foot blade fence?
For a 1.8 m blade fence, we set post spacing at no more than 2.4 m center-to-center. In wind zones where sustained speeds exceed 80 km/h, reduce to 1.8 m. The blade profile catches more wind than a flat panel, so wider spacing causes vibration that loosens fasteners over time — not an immediate collapse, but a gradual loss of rigidity you will feel when you push on a panel.
How do I prevent corrosion between aluminum posts and steel fixings?
Use a physical barrier between dissimilar metals. Nylon or EPDM isolation pads at every bracket-to-post interface, stainless steel fasteners, and electroplated hardware prevent galvanic corrosion. Never allow a standard galvanized bolt to contact an aluminum post directly. Our blade fence systems ship with nylon washers and 304 stainless fasteners mapped to each connection point.
Are there special brackets for corner posts?
Corner posts need angled brackets that turn the panel direction while keeping blade alignment consistent. For standard 90-degree corners, we supply two-bracket corner posts. Tighter angles require custom-fabricated brackets; if your layout includes acute corners, share your drawings early so post and bracket geometry can be confirmed before production.
Can I install blade fence without a concrete footing?
For lightweight, low-height blade fences under 1.2 m on stable clay or rock soil, screw-pile foundations or ground spikes can work. In sandy or expansive soils, and for any fence over 1.2 m, concrete footings are the only reliable method. If your site conditions fall outside typical residential soil behavior, send your geotechnical report or project photos to sales01@yulongkeji-ch.com and we will recommend an anchoring approach matched to your ground load capacity.
If you’re interested, check out these related articles:
Assembled vs Welded Aluminum Gates: Performance, Cost, & Use Cases
Steel vs Aluminum Fencing: Budget, Durability, and Value
Decorative Iron & Ornamental Steel Fence: Residential & Commercial Solutions
Custom Chain Link Fence: Gauges, Heights, Gates & Bulk Guide
Order Custom Aluminum Fencing from China: A Strategic Guide